
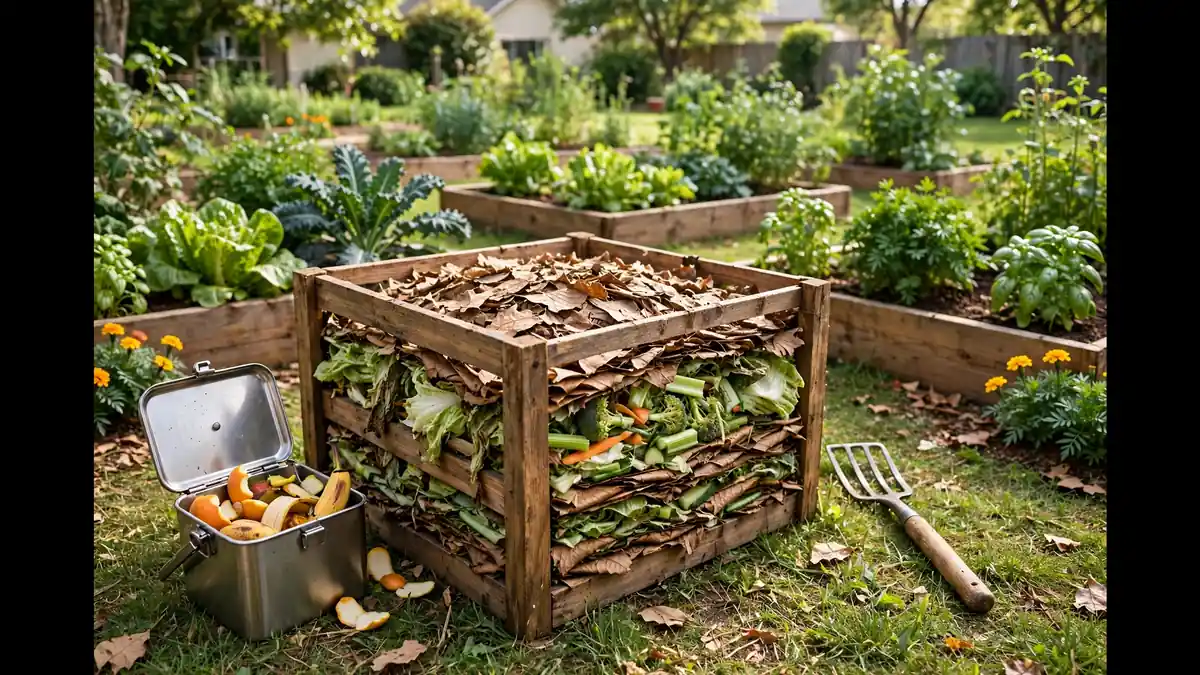
How to Start Composting at Home for Beginners: Greens, Browns, Bins and Troubleshooting
Learning how to start composting at home feels easier than most beginners expect. Basically, you copy what a forest floor already does naturally. Fallen leaves and scraps rot down slowly with air and moisture. Consequently, your kitchen waste becomes dark, crumbly compost for your plants.
This guide gives you one complete beginner system from start to finish. Firstly, you will choose a bin that suits your space. Secondly, you will learn the simple greens and browns balance. Finally, you will troubleshoot problems and harvest compost with confidence.
Composting also keeps useful material out of your household rubbish. Indeed, wider protection work matters too, as The Environmental Protection Department: The Unsung Hero Guarding Our Planet explains clearly. However, your own small pile still makes a real difference. Every bucket of scraps composted is waste handled at home.
What Actually Happens Inside a Compost Pile?
Tiny microbes, fungi and small creatures break down organic material gradually. They feed on your scraps, leaves and shredded cardboard over time. In addition, worms and beetles often join the work outdoors. Together, these helpers turn mixed waste into a soil-like material.
The process needs four basic things to keep working well. Food for microbes comes from your greens and browns mix. Air reaches the pile through loose layers and regular turning. Meanwhile, moisture keeps everything damp enough for life to thrive. Warmth then builds naturally as microbes feed and multiply.
Does composting need special equipment or expensive products to work?
Surprisingly, the answer is no for most ordinary households. A simple bin, a fork and a kitchen caddy suffice. Therefore, beginners should start cheaply and upgrade only if needed. Experience teaches you far more than any gadget can initially.
Choose Your System by Space: Garden, Balcony or Kitchen Only
Your available space should decide your setup before anything else. Garden owners enjoy the widest choice and the easiest routine. Balcony growers need compact, tidy and fully enclosed options instead. Meanwhile, kitchen-only households can still compost successfully with small systems.
The compost bin vs tumbler vs open pile beginners debate confuses many people. Each option suits a different space, budget and routine. Hence, matching the system to your home matters most. The table below compares the three classic outdoor choices.
| System | Best for | Main strength | Main drawback |
|---|---|---|---|
| Enclosed compost bin | Gardens and larger balconies | Tidy, affordable and pest-resistant | Turning takes effort with a fork |
| Compost tumbler | Small gardens and patios | Easy turning with a simple spin | Smaller capacity and higher cost |
| Open pile or bay | Large gardens with plenty of material | Free, spacious and simple to build | Open to weather and visiting animals |
Garden households usually do best with a bin or pile. Place it on soil or grass in partial shade ideally. Additionally, keep it reachable in wet weather without muddy shoes. A spot near the kitchen door encourages consistent daily habits.
Balcony households should choose a sealed tumbler or compact bin. A lid keeps smells contained and neighbours happy at all times. Furthermore, a tray underneath catches any drips before they stain. Small batches then suit the limited space perfectly well.
Kitchen-only households have two proven options worth considering first. A worm bin, called vermicomposting, handles scraps quietly indoors. Alternatively, a bokashi bucket ferments scraps before burial or composting. Both systems stay compact, and both avoid outdoor space entirely.
Greens vs Browns: Compost Ratio, Carbon and Nitrogen Explained
Understanding greens vs browns compost ratio carbon nitrogen balance unlocks everything else. Greens are moist, fresh materials that supply nitrogen for microbes. Browns are dry, woody materials that supply carbon and structure. Together, they feed the pile and keep it breathing.
Common greens include fruit scraps, vegetable peelings and grass clippings. Coffee grounds, tea leaves and fresh plant trimmings count too. In contrast, browns include dry leaves, straw and shredded cardboard. Torn newspaper, wood chips and plain paper also work well.
The working rule is three parts browns to one part greens. Gardeners call this the 3 to 1 browns-to-greens rule. Put simply, add roughly three bucketfuls of browns per greens bucketful. Consequently, the pile smells earthy instead of sour or sharp.
Does the ratio need to be exact every single time?
Thankfully, no measuring or weighing is needed at all. Eyeball the mix and adjust whenever the pile complains loudly. Too many greens cause slime, smell and fruit flies. Conversely, too many browns slow everything down to a crawl.
Seasonal thinking helps here, much like other home routines do. For example, Air Conditioning Repair in Sewickley: How to Choose Well This Year rewards seasonal checks. Similarly, autumn leaves give you a free browns store yearly. Stockpile them dry, and then use them all year round.
What Can You Compost? Fruit, Vegetable Scraps, Coffee Grounds and More
Beginners often ask exactly what can you compost safely at home. Fruit, vegetable scraps, coffee grounds and eggshells all compost beautifully. Bread crusts, cooked plain rice and pasta also break down. Additionally, hair, plain cardboard and paper towels can join occasionally.
Yard materials add welcome volume and variety to the mix. Grass clippings work well when added in thin layers only. Likewise, small twigs, dead flowers and untreated wood shavings help. Readers curious about wood types may enjoy Best Wood for Painted Furniture: Choosing the Perfect Canvas for Your Creativity afterwards.
Fruit scraps deserve one small habit for best results. Chop large pieces smaller so microbes reach them much faster. For instance, our Applesauce Food Mill Recipe: A Taste of Tradition and Modern Flavour leaves cores behind. Those cores compost happily when buried under dry browns.
What Not to Compost: Meat, Dairy and Pet Waste
Knowing what not to compost protects your pile from trouble. Meat, dairy and pet waste top the standard avoid list. Meat and dairy attract rodents and create strong odours quickly. Meanwhile, pet waste from cats and dogs may carry pathogens.
Several other items also belong in your regular rubbish instead. Glossy magazines, coal ash and treated wood should stay out. Similarly, diseased plants and persistent weeds can spread problems later. Cooking oils and fatty foods also cause smells and pests.
When in doubt, simply leave a doubtful item out entirely. A cautious pile stays healthy, sweet-smelling and easy to manage. In fact, beginners succeed fastest with a short, safe list. You can expand your inputs gradually as confidence grows later.
Setting Up Step by Step: How to Layer Compost With Base Branches and Airflow
Setup day takes under an hour for most beginners. Firstly, position your bin on level ground with drainage. Secondly, gather one bag of browns before adding any greens. Finally, keep a fork and watering can within easy reach.
Learning how to layer compost base branches airflow correctly prevents soggy bottoms. Start with a loose layer of small branches or twigs. That base lifts the pile and lets air circulate underneath. Consequently, excess water drains away instead of pooling below.
Next, add a thick layer of dry browns over the branches. Shredded cardboard or dry leaves both work well for this. Afterwards, add your first thin layer of kitchen greens. Cover those greens completely with more browns every single time.
That covering habit is the real secret of calm composting. Exposed scraps attract flies and release odours into the air. Buried scraps, however, start breaking down quietly and quickly. Hence, always finish with browns as your visible top layer.
Repeat those alternating layers as your caddy fills each week. Thin layers break down faster than one thick, heavy dump. Moreover, chopping or shredding material speeds the whole process noticeably. Small pieces simply give microbes more surface to feed on.
Your Kitchen Caddy: Collecting Scraps Odour Free Every Day
A small kitchen caddy collecting scraps odor free makes daily composting effortless. Choose a countertop container with a snug, well-fitting lid. Line it with newspaper or a compostable liner if preferred. Empty it into your outdoor bin every few days.
Where should a kitchen caddy sit for easiest daily use?
Ideally, place it beside your chopping board or sink. Convenience removes friction, and therefore the habit sticks long term. Rinse the caddy weekly with hot water and mild soap. A sprinkle of browns inside also absorbs moisture and odours.
Freezer storage offers another neat trick for sensitive households. Freeze scraps in a tub until outdoor emptying day arrives. Frozen scraps smell less and attract fewer flies indoors. Thus, even tiny kitchens can collect scraps without any fuss.
Compost Moisture: The Wrung-Out Sponge Rule
The compost moisture wrung out sponge rule gives beginners a perfect test. Grab a handful of material and squeeze it firmly once. It should feel damp, like a sponge you have wrung. Only a drop or two of water should appear.
Material that drips freely is simply far too wet overall. Add dry browns, mix them in and leave the lid ajar. Conversely, material that feels dusty needs water added slowly. Sprinkle water while turning until the sponge feeling returns again.
Rain can upset this balance quickly in open piles outdoors. A simple cover or lid keeps heavy rain out effectively. During dry spells, kitchen scraps usually supply enough moisture alone. Still, check weekly so small problems never become big ones.
How Often to Turn a Compost Pile?
Many beginners wonder how often to turn compost pile material. Turning once every one to two weeks suits most households. Turning adds oxygen, mixes wet and dry pockets evenly together. As a result, decomposition stays active and odours stay away.
Tumbler owners can spin their drum every few days easily. Bin owners can fork material from the centre outward instead. Alternatively, a compost aerator tool twists air deep into piles. Any method works, provided air reaches the middle regularly.
What happens if you rarely turn your compost at all?
Honestly, the pile still composts, although far more slowly. Nature works patiently even without your help each week. Therefore, busy beginners should not abandon a neglected pile. One good turning session usually revives it very quickly.
That steady, patient approach mirrors other sustainable projects too. For example, Fairview Gardens Education Farm: Cultivating Knowledge and Sustainable Futures shows learning through seasons. Composting teaches similar patience, one small weekly habit at a time. Broader thinking in Triple Bottom Line Agility: Re-engineering Business Service Architectures for Sustainable Enterprise Growth values people, planet and practicality together. Your pile quietly practises that same balance at home.
Troubleshooting Table: Smells, Flies, Slime and Slow Piles
Most compost problems look dramatic yet fix surprisingly easily. If compost smells bad, fix add browns aerate the pile first. That single response solves the majority of beginner complaints quickly. The table below covers the problems you will likely meet.
| Problem | Likely cause | Simple fix |
|---|---|---|
| Strong sour or ammonia smell | Too many greens and too little air | Add dry browns, then fork the pile thoroughly |
| Fruit flies in compost | Exposed scraps sit on the surface | Bury scraps solution: cover with browns every time |
| Slimy, wet and heavy pile | Excess moisture and compacted layers | Mix in shredded cardboard and leave lid ajar |
| Dry pile doing nothing | Too many browns and too little moisture | Add greens, sprinkle water and turn well |
| Rodents or foxes visiting | Meat, dairy or cooked food inside | Remove problem food and use a lidded bin |
| Nothing seems to break down | Pieces too large or pile too small | Chop materials smaller and keep adding steadily |
Fruit flies in compost annoy nearly every beginner at first. Bury scraps solution habits end the problem within days usually. Always push fresh scraps into the centre of the pile. Then cover them with a generous handful of dry browns.
Smell problems follow a similar pattern of cause and cure. A healthy pile smells earthy, like a woodland floor after rain. Sharp or rotten smells signal imbalance, not total failure ever. Correct the balance calmly, and then wait a few days.
How Long Does Compost Take? Ready Signs: Dark, Crumbly and Earthy
People understandably ask, how long does compost take at home?
Ready signs dark crumbly texture and an earthy smell tell you. Generally, home compost takes weeks to months, depending on care. Warm, turned and balanced piles finish far faster than neglected ones. Cool, dry or unbalanced piles simply need much longer overall.
Finished compost looks nothing like the scraps you added originally. It appears dark brown, crumbly and fairly uniform in texture. Moreover, you cannot recognise peelings, leaves or grounds any more. A pleasant, soil-like smell confirms the transformation is complete.
Harvest by removing finished material from the bottom first. Many bins have a hatch or door for this purpose. Otherwise, shift unfinished top material aside and dig below it. Sieve the harvest if you want a finer finished texture.
Return any lumpy, unfinished pieces to the active pile afterwards. They will break down during the next cycle without fuss. Meanwhile, let harvested compost rest briefly before using it widely. That short rest lets the material settle and mature fully.
How to Use Finished Compost in Garden Beds and Potting Mix
Knowing how to use finished compost garden beds potting mix completes the journey. Spread a layer over garden beds and fork it in lightly. Vegetables, flowers and shrubs all welcome that gentle feeding boost. Additionally, compost works beautifully as a mulch around established plants.
Potted plants benefit from compost mixed into their potting mix. Blend roughly one part compost with several parts potting mix. That blend improves moisture holding and feeds roots very gently. Consequently, pots dry out more slowly during warm weather spells.
Lawns also respond well to a thin compost dressing annually. Sieve the compost first, then scatter it lightly over grass. Rain and worms carry the goodness down to the roots. Similarly, trees appreciate a ring of compost under their canopy.
Trees reward that care over many seasons of growth ahead. Our guide to Olea Europaea: The Majestic Beauty and Benefits of Olive Trees explores one beloved example. Mulching such trees with compost helps soil stay moist longer. Hence, your kitchen scraps eventually support even your largest plants.
Your First Month: A Simple Routine That Builds the Habit
A light weekly routine keeps your pile healthy without effort. Collect scraps daily in your kitchen caddy as normal. Empty the caddy outdoors twice weekly and cover with browns. Then turn or aerate the pile roughly once a fortnight.
Check moisture with the sponge squeeze test during each visit. Adjust with browns or water whenever the test feels wrong. Besides that, simply observe how smells and textures change weekly. Those observations quickly teach you what your pile personally needs.
What is the single best habit for a brand-new composter?
Above all, cover every addition of greens with dry browns. That one habit prevents smells, flies and slime most reliably. Everything else in this guide simply supports that golden rule. Start today, start small and let the pile teach you.