
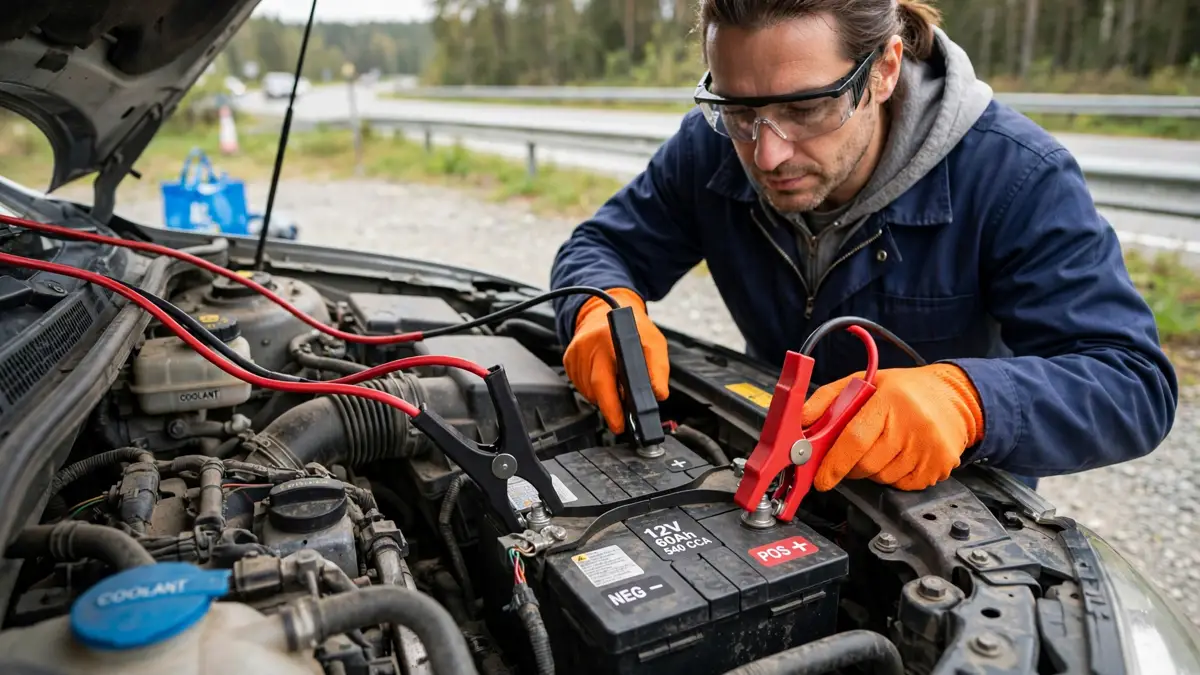
You are standing beside a silent car with a phone in your hand. Consequently, you need clear steps right now rather than a long lecture. Indeed, learning how to jump start a car safely takes only a few careful minutes. However, the wrong order can spark, damage electronics, or injure you. Therefore, this guide gives you the exact sequence in plain language. Additionally, you will learn the grounding rule and the safe removal order. Moreover, you will see when you must never attempt a jump at all.
What should you check before you touch any cables?
Firstly, park both cars close together without letting the bodies touch. Secondly, switch off both ignitions and remove the keys completely. Additionally, turn off lights, heaters, radios, and phone chargers in both cars. Consequently, the electrical load stays low when the surge arrives. Meanwhile, put on safety gloves eye protection jump start gear if you have it. Indeed, gloves protect your hands from corrosion and sharp clamps. Similarly, eye protection shields you from acid spray or stray sparks. Above all, keep loose clothing and jewellery away from the engine bay.
Next, look closely at both batteries before you connect anything. For example, check for cracked cases, wet terminals, or white crusty buildup. However, light corrosion alone does not stop a jump start. In contrast, heavy damage means you should stop immediately. Therefore, read the next section carefully before you proceed. Ultimately, a thirty-second inspection prevents the most serious mistakes.
When should you never try to jump start a car?
Firstly, learn the signs battery too damaged to jump swollen leaking before anything else. For instance, a bulging or swollen case signals dangerous internal failure. Similarly, leaking acid around the caps means the battery is unsafe. Additionally, a frozen battery must never receive a jump attempt. Consequently, charging a frozen battery can cause it to burst. Furthermore, a strong rotten-egg smell points to escaping hydrogen gas. Therefore, walk away and call professional help in those cases. Indeed, no journey is worth an acid burn or an explosion.
Meanwhile, inspect the cables themselves for frayed or exposed wire. In fact, damaged cables can short out and melt quickly. However, intact cables with clean clamps are fine to use. On the other hand, cables that feel stiff or cracked need replacing. Above all, never let the red and black clamps touch each other. Consequently, keeping the clamps apart protects both cars from a short circuit. Finally, if you feel unsure at any point, stop and seek help.
What is the correct jumper cable connection order red black?
Firstly, the jumper cable connection order red black follows a simple pattern. Secondly, you connect red to dead, then red to good. Thirdly, you connect black to good, then ground the last clamp. Indeed, this order keeps sparks away from the dead battery. However, many drivers rush and guess the order at roadside. Consequently, guessing creates the exact risk this sequence avoids. Therefore, say the order aloud before you open either bonnet. Additionally, keep the final black clamp in your hand until last.
Step one connects red to the positive terminal of the dead battery. Meanwhile, step two connects the other red clamp to the good battery. Next, step three connects black to the negative terminal of the good battery. Finally, step four grounds the remaining black clamp on bare metal. For example, an unpainted bolt or bracket works well for grounding. In contrast, the dead battery negative terminal is the wrong final spot. Ultimately, that last decision is the heart of safe jump starting.
Why ground last cable to engine block not battery?
Firstly, you should understand why ground last cable to engine block not battery matters. Indeed, a dead battery can release flammable hydrogen gas around its vents. Consequently, a spark near that gas could ignite it suddenly. However, grounding on the engine block moves the spark far away. Therefore, the final connection happens at a safe distance from the battery. Additionally, the engine block provides a solid, unpainted electrical path. In fact, paint and rust weaken the ground connection considerably. Similarly, grease or dirt can block current in the same way.
Meanwhile, choose a thick metal part that sits away from moving belts. For instance, a strut bolt or engine lifting eye works well. On the other hand, never clamp onto fuel lines or brake lines. Above all, keep the clamp clear of fans and belts completely. Consequently, a secure ground lets the starter draw full power. Furthermore, a weak ground often causes slow cranking or clicking. Finally, once grounded, keep your face away from both batteries.
How do you start the cars in the right sequence?
Firstly, start the engine of the good car and let it idle. Secondly, wait a few minutes while it idles steadily. Consequently, the dead battery gains a small surface charge meanwhile. However, do not rev the good engine hard during this wait. In fact, gentle idling protects the alternator and the electronics. Next, move to the dead car and try starting it normally. Additionally, turn the key or press the button for short bursts only. Therefore, pause between attempts so the starter motor can cool.
If the engine cranks slowly, wait longer and try again. Meanwhile, check that every clamp still grips its terminal tightly. Indeed, a loose clamp is the most common cause of failure. On the other hand, repeated long cranking overheats the starter quickly. Consequently, limit each attempt to about ten seconds at most. Furthermore, successful starting means you should keep both engines running briefly. Finally, let the revived car idle while you prepare for removal. If you later need routine care, a trusted service such as McKeesport Auto Service can test the battery properly.
How to remove jumper cables reverse order safely?
Firstly, you must know how to remove jumper cables reverse order without sparking. Secondly, removal simply undoes the connection sequence step by step. Indeed, you remove the grounded black clamp from the engine block first. Next, you remove the black clamp from the good battery negative terminal. Then, you remove the red clamp from the good battery positive terminal. Finally, you remove the red clamp from the dead battery last. Consequently, the live battery becomes isolated before you finish the job.
Meanwhile, never let a loose clamp dangle onto metal bodywork. However, holding one clamp in each hand invites accidental contact. Therefore, set each removed clamp down on dry ground separately. Additionally, keep the revived engine running throughout the whole removal. In fact, switching it off now often means it will not restart. Similarly, leave lights and heaters off until removal is complete. Above all, coil the cables only after every clamp is free. Workshops like Lincoln Wilson Auto Service follow this same reverse routine daily.
How long to drive after jump start recharge properly?
Firstly, drivers always ask how long to drive after jump start recharge time. Indeed, general guidance suggests driving for roughly twenty to thirty minutes. Consequently, steady driving lets the alternator restore meaningful charge meanwhile. However, idling in a driveway recharges the battery far more slowly. Therefore, take a proper drive on open roads instead. Additionally, keep electrical loads low during that recovery drive. For example, delay heated seats, blower fans, and loud audio systems. In contrast, headlights at night remain essential and should stay on.
Meanwhile, avoid switching the engine off during short errands afterwards. In fact, a weak battery may fail again at the next stop. Similarly, several short trips rarely rebuild a deeply discharged battery. On the other hand, a battery charger at home gives a fuller recovery. Ultimately, repeated flat batteries signal a deeper fault that needs testing. Finally, book a proper battery test if the problem returns soon. A thorough check at Mike Akbar Auto Service can confirm the real cause.
What does jump start car wont start clicking starter mean?
Firstly, a jump start car wont start clicking starter symptom needs calm diagnosis. Indeed, rapid clicking usually means insufficient power reaches the starter motor. Consequently, poor clamp contact is the first thing to check. However, a single loud click points more towards a faulty starter. Therefore, clean the terminals and reseat every clamp before retrying. Additionally, wiggle each clamp gently to confirm a tight grip. Meanwhile, allow more charging time from the good car as well. In fact, a deeply flat battery needs several minutes before cranking.
If clicking continues, the battery may be beyond recovery entirely. On the other hand, corroded cables can block current despite clean terminals. Similarly, a failed starter motor will not turn even with full power. Above all, stop cranking repeatedly because heat damages the starter fast. Consequently, persistent clicking after a correct jump means professional diagnosis. Furthermore, silence with no click at all suggests an ignition fault. Finally, dashboard lights that fade during cranking confirm severe voltage drop. Centres such as Gomora Auto Service can separate battery faults from starter faults quickly.
Can jump starting damage car electronics in modern cars?
Firstly, many owners ask can jump starting damage car electronics today. Indeed, modern cars carry sensitive modules that dislike voltage spikes. Consequently, the correct order protects those modules during the surge. However, reversing the cables can destroy fuses and control units instantly. Therefore, double-check every terminal marking before you clamp down. Additionally, switch off infotainment and climate systems in both cars beforehand. Meanwhile, connect and remove clamps cleanly without scraping them around. In fact, repeated sparking creates the spikes that harm electronics most.
On the other hand, a careful jump done correctly is generally safe. Similarly, surge-protected cables offer extra peace of mind for newer cars. Above all, never jump a car with mismatched system voltages. Consequently, always match the donor car voltage to your own car. Furthermore, hybrid and electric models need their manuals checked first. Finally, their low-voltage battery procedure often differs from conventional cars. If warning lights appear afterwards, visit Shiva Auto Repair and Services for an electronic scan.
How does a portable jump starter pack how to use differ?
Firstly, a portable jump starter pack how to use guide starts simpler. Indeed, you need no second car and no helpful stranger. Consequently, the pack suits empty car parks and late-night breakdowns. Secondly, connect the pack red clamp to the positive terminal. Thirdly, connect the pack black clamp to an engine ground point. However, always follow the specific instructions supplied with your pack. Therefore, switch the pack on only after both clamps sit securely. Additionally, start the car promptly because pack power is limited.
Meanwhile, remove the pack clamps soon after the engine starts. In fact, most packs instruct removal within about thirty seconds. Similarly, reverse polarity alarms on modern packs prevent serious mistakes. On the other hand, a depleted pack cannot help you at all. Consequently, recharge your pack after every single use without delay. Furthermore, store it in the car and check it seasonally. Finally, packs struggle more with large diesel engines in winter. Keep your car serviced by teams like Flying Eagle Auto Service so the pack stays a backup.
How does jump start diesel vs petrol battery voltage compare?
Firstly, the jump start diesel vs petrol battery voltage question confuses many drivers. Indeed, most cars in both groups use a twelve-volt system. Consequently, the voltage itself usually matches between donor and recipient. However, diesel engines need far more cranking current to start. Therefore, use thick cables and a strong donor battery for diesels. Additionally, diesel glow plugs draw extra power before cranking begins. Meanwhile, wait for the glow plug light to go out first. In fact, rushing that step makes diesel starting noticeably harder.
On the other hand, some larger diesel vehicles use twenty-four-volt systems. Similarly, twin-battery setups appear in certain trucks and off-roaders. Above all, never connect a twenty-four-volt system to a twelve-volt car. Consequently, always check the battery label when you feel uncertain. Furthermore, a petrol donor may struggle to turn a big diesel. Finally, a portable pack must be rated for diesel engines too. Checking labels takes seconds, yet it prevents expensive damage.
How do you jump start push button start cars correctly?
Firstly, learning to jump start push button start cars feels slightly different. Indeed, the cable sequence itself stays exactly the same as before. Consequently, only the starting action inside the cabin changes. Secondly, press the brake or clutch pedal as your manual directs. Thirdly, hold the start button a little longer than usual. However, do not pump the button repeatedly in quick succession. Therefore, give the starter time to respond between each attempt. Additionally, keep the key fob inside the car near the button.
Meanwhile, a weak fob battery can confuse the starting system. In fact, many cars let you press the fob against the button. Similarly, that trick powers the fob passively for one start. On the other hand, dashboard messages may guide you through backup steps. Above all, consult the manual section for a flat battery procedure. Consequently, following the maker procedure avoids confusing the immobiliser system. Finally, once running, drive steadily to recharge as described earlier. For related vehicle care reading, see this guide on legal tint in Connecticut after your car is running again.
What if your car dies again after jump start alternator test time?
Firstly, a car dies again after jump start alternator test becomes essential. Indeed, a healthy alternator should keep the engine running after starting. Consequently, stalling soon after cable removal points towards alternator failure. However, an exhausted battery can produce a very similar symptom. Therefore, proper testing separates the two faults before you spend money. Additionally, dimming headlights while driving suggest weak alternator output. Meanwhile, a battery warning light on the dashboard supports that suspicion. In fact, that light usually monitors the charging system directly.
On the other hand, a battery that will not hold charge also fails. Similarly, loose or corroded alternator connections can mimic component failure. Above all, avoid driving far when the charging system seems faulty. Consequently, the car can stop completely once battery reserves run out. Furthermore, repeated jump starts will not fix a dead alternator. Finally, arrange a charging system test at the earliest opportunity. Ultimately, knowing the faulty part first saves time, money, and stress.
What mistakes damage cars most during a jump start?
Firstly, reversing the red and black cables causes the worst damage. Indeed, that single error can melt wiring and ruin electronics. Consequently, always read the plus and minus markings in good light. Secondly, letting the clamps touch creates dangerous short circuits. Thirdly, grounding on the battery terminal risks igniting hydrogen gas. However, each of these mistakes disappears with a slower routine. Therefore, follow the printed order even when you feel rushed. Additionally, smoking near a charging battery is seriously dangerous behaviour.
Meanwhile, jump starting a visibly damaged battery remains a grave error. In fact, swelling, leaking, or freezing means replacement, not revival. Similarly, using thin, cheap cables on a diesel often fails. On the other hand, patience during charging solves many apparent failures. Above all, removing cables in the wrong order invites needless sparks. Finally, switching off too soon wastes the entire recovery drive. Consequently, treat the full routine as one connected safety system.
What should you do in the days after a successful jump?
Firstly, monitor how the car starts over the following few days. Indeed, slower cranking each morning signals a weakening battery again. Consequently, arrange a load test before the battery strands you twice. However, one flat battery after leaving lights on may be innocent. Therefore, consider the cause honestly before replacing parts unnecessarily. Additionally, clean the terminals and protect them against future corrosion. Meanwhile, check that the terminal clamps tighten fully without rocking. In fact, loose terminals imitate battery failure with surprising accuracy.
On the other hand, frequent short journeys gradually drain any battery. Similarly, cold weather exposes weak batteries that summer hides. Above all, keep a portable pack charged if your battery ages. Consequently, you gain a backup for the next cold morning. Furthermore, keep basic gloves and eye protection with your cables. Finally, knowing how to jump start a car safely turns a crisis into a routine fix.
Explore more practical guides on WordGlowUp.